How to Repair an Asphalt Pickleball Court: Step-by-Step DIY Guide to Filling Cracks, Patching Potholes, and Resurfacing
Repairing an asphalt pickleball court can extend its service life, preserve a consistent playing surface, and reduce long‑term maintenance expenses for players. One will learn how to assess damage, fill cracks, patch potholes, and apply a resurfacing coat using professional‑grade tools in a systematic manner. The guide emphasizes safety, material selection, and step‑by‑step procedures that a competent DIY enthusiast can follow without specialized training or professional assistance. By the conclusion, the reader will possess a clear roadmap to restore the court to tournament‑ready condition with confidence and minimal downtime.
What You’ll Need
- Protective gloves, safety glasses, and a dust mask
- Stiff broom and a garden hose or pressure washer
- Measuring tape and chalk line
- Pavemade Asphalt Crack Filler (20 lb)
- Cold‑asphalt patch mix for potholes
- Metal trowel and putty knife
- Heavy‑weight roller or tamping plate
- Sealant or resurfacing coating suitable for sports surfaces
- Sand or fine aggregate for finishing
Step 1: Inspect the Court
The first action is to walk the entire surface while observing lighting conditions that reveal surface irregularities. One should mark all visible cracks, depressions, and loose aggregate with chalk to create a repair map. It is essential to differentiate between hairline fissures that require sealing and deeper fractures that demand patching. Photographic documentation assists in tracking progress and verifying that no defect is overlooked during later stages. A thorough inspection prevents rework and ensures that subsequent steps address every flaw.
Step 2: Clean the Surface
All debris, dust, and loose particles must be removed before any repair material is applied. One can employ a stiff broom to sweep the area, followed by a low‑pressure hose to rinse away finer particles. For stubborn oil stains or old sealant residues, a biodegradable degreaser applied with a scrub brush will improve adhesion. After cleaning, the surface should be allowed to dry completely, which typically requires three to four hours under sunny conditions. A clean substrate is the foundation of a durable repair.
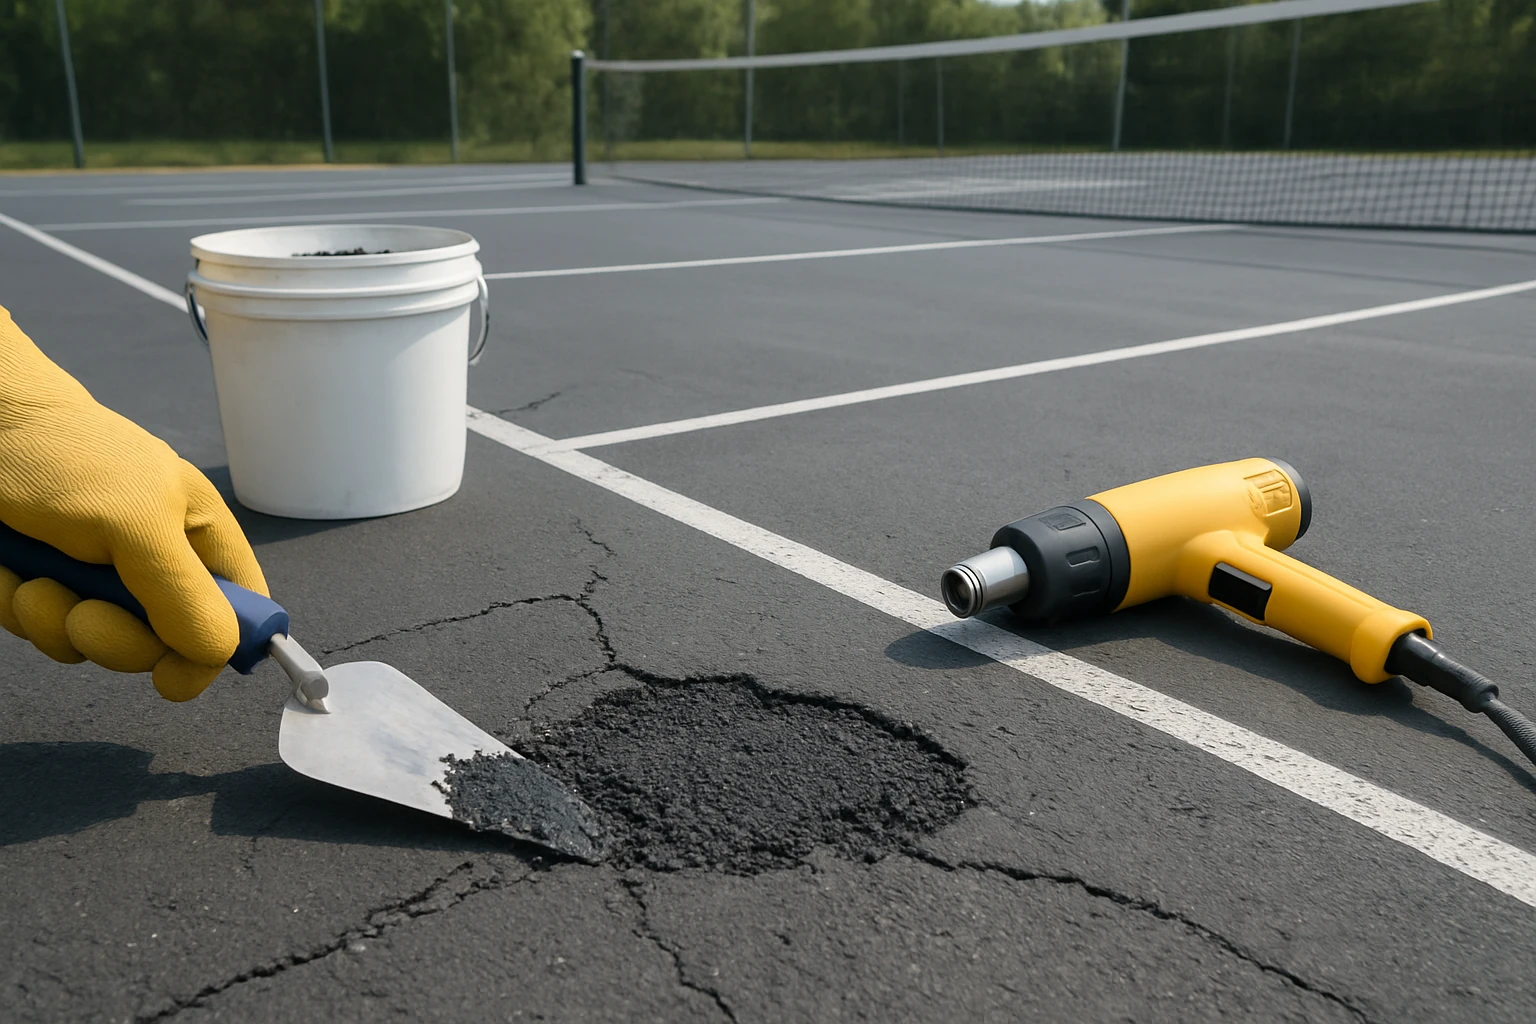
Step 3: Prepare Cracks for Filling
Before introducing any filler, each crack should be widened slightly with a cold‑chisel or a crack‑opening tool to a uniform width of approximately ¼ inch. This step encourages the filler to flow into the void and creates a mechanical key for better bonding. One must then remove the loosened material using a vacuum or a hand brush, ensuring the crack is dry and free of contaminants. If the crack depth exceeds one inch, a backer rod made of foam can be inserted to reduce material usage and prevent sagging. Proper preparation reduces the likelihood of future cracking at the repaired joints.
Step 4: Fill Cracks with Pavemade Asphalt Crack Filler
The selected product is a premium easy‑melt, high‑performance asphalt crack filler designed for compatibility with oil‑jacketed kettles and direct‑fire filling machines. It melts quickly, offers superior stretch‑ability, and creates a permanent waterproof seal, which is essential for a sports surface exposed to moisture and temperature fluctuations. One should pre‑heat the filler according to the manufacturer’s instructions, typically to a temperature that allows smooth flow without smoking. Using a caulking gun or a heated dispensing wand, the filler is poured into each prepared crack, over‑filling slightly to accommodate shrinkage. After the material cools, a light sanding removes excess filler and restores a flush surface, after which a sealant can be applied for added protection.
Step 5: Patch Potholes
For depressions larger than a hairline crack, a cold‑asphalt patch mix provides a robust solution that adheres without heating. One should dampen the pothole lightly with water to improve bonding, then fill the void with the patch mix using a trowel, compacting it in layers of approximately one inch. Each layer must be tamped with a heavy‑weight roller to eliminate air pockets and achieve a density comparable to the surrounding pavement. The surface should be feathered at the edges to blend seamlessly with the existing court. Once the patch has cured for at least 24 hours, a thin coat of sealant can be applied to unify the repair with the surrounding area.
Step 6: Apply Sealant or Resurfacing Coat
The final protective layer safeguards the repaired surface from UV radiation, water infiltration, and wear from foot traffic and equipment. One should select a sealant formulated for sports courts that offers a non‑slip finish and is compatible with the underlying asphalt. The sealant is applied with a squeegee or a roller in thin, even passes, allowing each coat to dry according to the product specifications before applying the next. Typically, two to three coats provide optimal durability and a uniform appearance. After the final coat cures, the court is ready for line marking and regular play.
Tips & Pro Tips
- Perform all repairs during moderate weather; temperatures between 50 °F and 70 °F promote optimal curing.
- When using Pavemade Asphalt Crack Filler, apply a thin sand layer over the filler in hot weather to prevent stickiness.
- Use a laser level to verify that the resurfaced area remains level with the surrounding court.
- Maintain a clean work area to avoid contaminating fresh repair material with dust or debris.
- Record the amount of filler used; the product’s calculator can help estimate future needs for larger projects.
Troubleshooting
If the filler becomes tacky after cooling, it is likely that the ambient temperature exceeded the recommended range; one should sand the surface and reapply a thin sealant layer. Cracks that re‑open within a week may indicate insufficient backer rod support or inadequate cleaning before filler application. Pothole patches that settle over time often result from insufficient compaction; additional tamping and a second layer of patch mix can resolve the issue. Persistent water seepage after sealing suggests that the underlying base may be compromised and requires professional evaluation.
Conclusion
The guide has outlined a comprehensive, step‑by‑step process for repairing an asphalt pickleball court, from initial inspection through final resurfacing. One now possesses the knowledge to select appropriate materials, execute precise repairs, and apply protective coatings that extend the court’s lifespan. By following the recommended practices and utilizing tools such as Pavemade Asphalt Crack Filler, a DIY enthusiast can achieve results comparable to professional maintenance crews. Consistent upkeep using the described methods will ensure a safe, high‑performance playing surface for many seasons. The reader is encouraged to schedule regular inspections and address minor issues promptly to avoid costly major repairs.
Products Mentioned in This Guide
Frequently Asked Questions
What safety gear is essential when repairing an asphalt pickleball court?
Wear protective gloves, safety glasses, and a dust mask to guard against debris and fumes.
How do I properly clean the surface before filling cracks?
Sweep away loose debris with a stiff broom and rinse with a garden hose or pressure washer, then let it dry fully.
Which product is recommended for filling small cracks in the asphalt?
Pavemade Asphalt Crack Filler (20 lb) is a reliable, DIY‑friendly option for crack repair.
What is the best method for patching potholes in an asphalt court?
Clean the hole, apply a cold‑asphalt patch mix with a metal trowel, and compact it firmly until level with the surrounding surface.
How often should I resurface an asphalt pickleball court after repairs?
Resurface every 5–7 years, or sooner if cracks reappear, to maintain a smooth, tournament‑ready playing surface.