Introduction
Backyard owners are increasingly seeking ways to maximize limited outdoor space by combining two popular sports into a single, versatile court. This guide explains how to design, install, and maintain a multi‑sport surface that supports both pickleball and basketball, while keeping costs reasonable. Readers will learn how to measure the area, prepare a stable base, apply durable markings, and install modular flooring that meets safety standards. By following each step, one can create a professional‑grade playing area that delivers years of enjoyment for family members and neighbors.
What You’ll Need
- Measuring tape, chalk line, and a level for accurate layout.
- Surface preparation tools such as a rake, shovel, and compacting plate.
- Monarch Pickleball Court Tape – 230 ft roll, glare‑free, residue‑free removal.
- Outdoor Basketball Court Tiles – 10‑piece green interlocking set.
- Utility knife, rubber mallet, and safety gloves.
- Exterior‑grade sealant and cleaning hose for final maintenance.
Step 1: Assess Space and Determine Dimensions
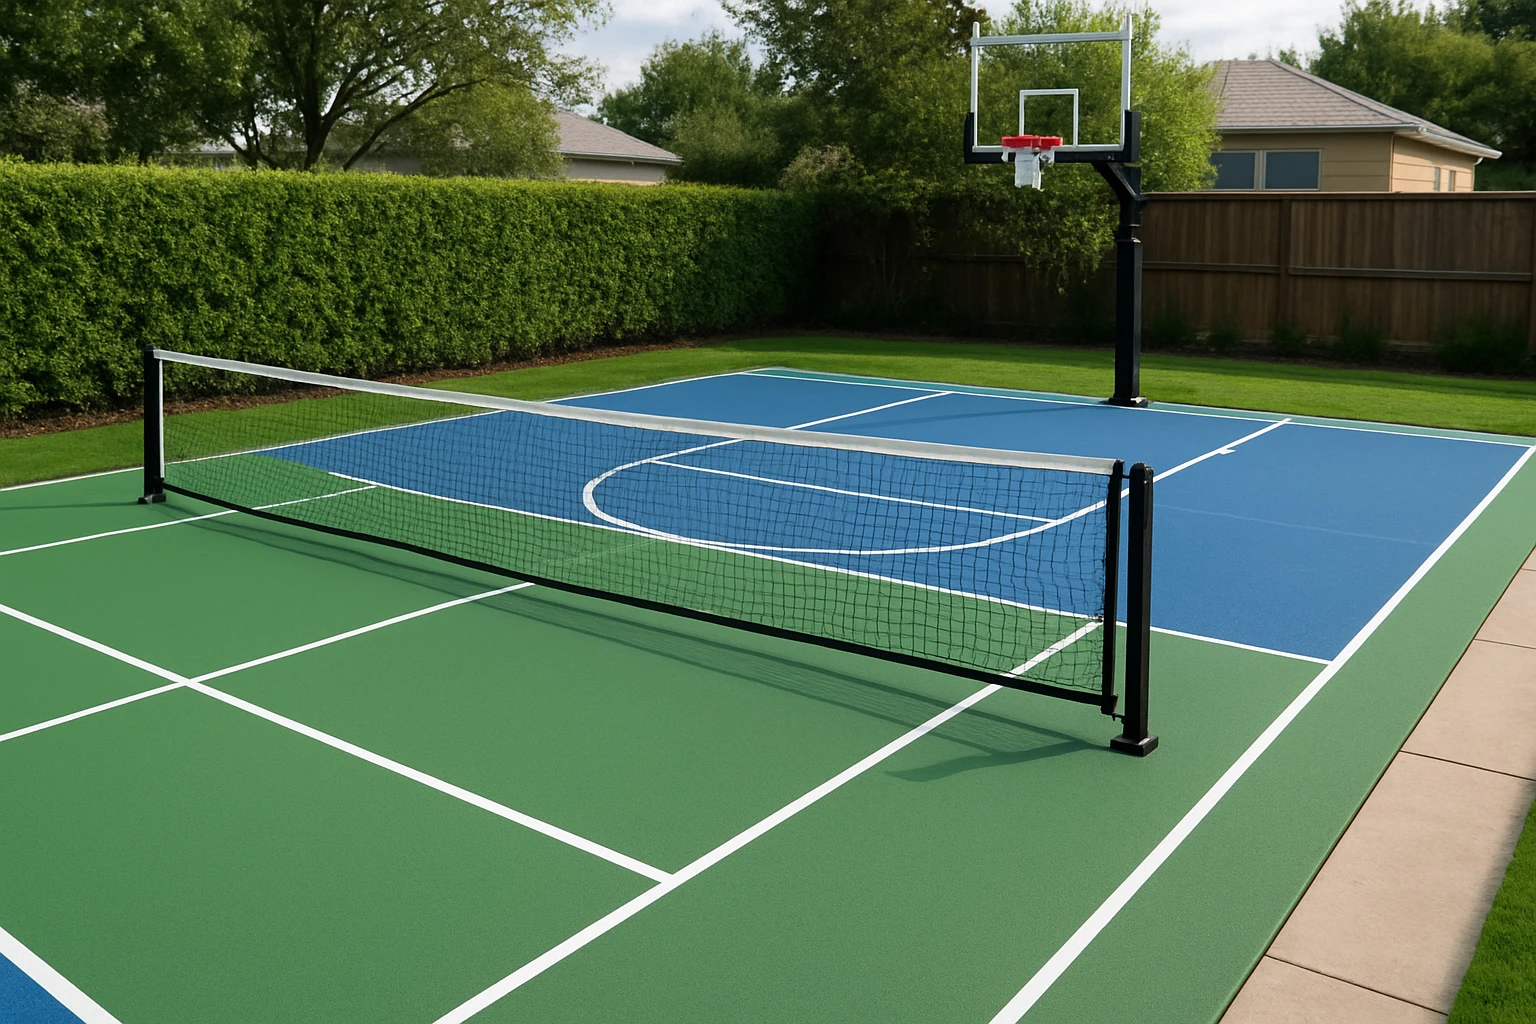
The first task is to measure the available backyard area and decide how the two courts will share it. A standard pickleball court measures 20 ft × 44 ft, while a basketball half‑court typically requires 42 ft × 50 ft; however, a flexible layout can overlap the two playing zones. Use a measuring tape to record length and width, then sketch a scaled diagram on graph paper, noting where the basketball key and pickleball non‑volley zones will intersect. This visual plan will guide the placement of court tape and interlocking tiles, ensuring that each sport retains its required dimensions without compromising safety.
Step 2: Prepare the Base and Ensure Proper Drainage
Even ground is essential for both sports because uneven surfaces increase injury risk and affect ball bounce. Clear the area of grass, rocks, and debris, then level the soil with a rake and compact it using a plate compactor or hand tamper. If the site is prone to rain, create a slight slope (approximately 1‑2 %) away from the playing surface to promote water runoff. Once the base is firm and level, lay a weed‑blocking fabric to prevent future growth, then spread a thin layer of fine gravel for additional stability.
Step 3: Install Monarch Pickleball Court Tape for Markings
Accurate line markings are the hallmark of a professional court, and the Monarch Pickleball Court Tape provides a reliable solution. This 230‑ft gaffer‑style cloth tape offers a glare‑free finish, which maintains visibility under bright sunlight, and it removes without leaving sticky residue, allowing future reconfiguration. Begin by positioning a chalk line along the outer perimeter of the combined court, then apply the tape in 2‑inch widths, following the official pickleball dimensions for the baseline, sideline, and non‑volley zone. The tape adheres to concrete, asphalt, and wooden gym floors, making it suitable for both the underlying ground and the interlocking tiles that will be installed later. The product costs $7.99 and holds a 3.7‑star rating from 39 reviews, indicating satisfactory performance for most DIY enthusiasts.
Step 4: Lay Outdoor Basketball Court Tiles for a Durable Surface
After the tape is in place, the next step is to provide a cushioned, slip‑resistant surface for basketball play. The Outdoor Basketball Court Tiles are modular, interlocking pieces made from durable polypropylene that can be snapped together without glue or tools. Each tile measures 9.84 in × 9.84 in and includes built‑in drainage holes, allowing water to pass through quickly and preventing puddles during rain. Arrange the tiles in a grid that covers the entire playing area, cutting any excess pieces with a utility knife to fit the exact dimensions of your layout. The green color provides a visual contrast with the white pickleball lines, enhancing overall aesthetics and helping players differentiate between sport zones. Priced at $89.99 for a 10‑piece pack, these tiles have a perfect 5‑star rating, reflecting their high quality and ease of installation.
Step 5: Mark Basketball Boundaries on the Tile Surface
With the tiles securely interlocked, it is time to add the basketball-specific markings. Use a fine‑point permanent marker or a short length of the same Monarch tape in a contrasting color to outline the free‑throw line, three‑point arc, and key area. Because the tape is residue‑free, any future adjustments—such as expanding the court or converting the space back to a pure pickleball layout—can be performed without damaging the tile surface. Verify measurements with a tape measure, ensuring that the basketball lines are centered within the larger court footprint to maintain balanced play. This dual‑marking approach maximizes the utility of the backyard space while preserving the professional appearance of both sports.
Step 6: Final Touches, Safety Checks, and Maintenance
Before the court is ready for use, conduct a thorough safety inspection. Walk the entire surface to confirm that all tiles are locked together, that no gaps exist beneath the tape, and that the perimeter is free of protruding edges. Apply an exterior‑grade sealant around the outer edge of the court to protect the base from erosion, especially if the area is exposed to heavy rain. Regular maintenance includes hosing down the tiles to clear debris and periodically checking the tape for wear; the Monarch tape can be removed and replaced without leaving residue, simplifying upkeep. By following these steps, one creates a resilient, multi‑sport backyard court that can endure years of active use.
Tips & Pro Tips
- Schedule installation on a dry day; moisture can interfere with tape adhesion and tile interlocking.
- Use a rubber mallet to gently tap each tile into place, ensuring a snug fit without cracking the material.
- Consider adding low‑profile lighting along the perimeter for evening play; LED strip lights are easy to install and energy‑efficient.
- If space permits, incorporate a small storage bench for equipment such as paddles, balls, and nets, keeping the area tidy.
- When re‑marking lines, use a light‑weight measuring wheel to speed up the process and maintain accuracy.
Troubleshooting
- Problem: Tape lifts after a few weeks of use.
Solution: Clean the surface with mild soap and water before re‑applying; ensure the area is completely dry and free of dust. - Problem: Tiles shift under heavy foot traffic.
Solution: Press each tile firmly with a rubber mallet and verify that the interlocking clips are fully engaged; add a thin layer of sand beneath the tiles for additional stability. - Problem: Water pools on the surface during rain.
Solution: Check that drainage holes are not blocked and that the base slope directs water away from the court.
Conclusion
Creating a multi‑sport backyard court for pickleball and basketball is an achievable DIY project that combines careful planning, proper surface preparation, and the right tools. By measuring accurately, preparing a solid base, applying Monarch Pickleball Court Tape, and installing Outdoor Basketball Court Tiles, one can build a durable, professional‑looking court without excessive expense. Ongoing maintenance, such as periodic cleaning and line replacement, will keep the space functional and safe for years to come. Armed with this guide, readers can confidently transform their backyard into a hub of active recreation for family and friends.
Products Mentioned in This Guide
Frequently Asked Questions
What size area is needed for a combined pickleball and basketball court?
A standard pickleball court (20 × 44 ft) fits inside a half‑court basketball layout, so a minimum of 30 × 50 ft provides comfortable spacing for both sports.
How do I prepare the base to ensure a stable multi‑sport surface?
Excavate to a 4‑6 in depth, add a compacted gravel layer, then lay a 1‑in concrete or paver base before installing interlocking tiles.
Can I use the same markings for both sports without confusion?
Yes; use contrasting colors—typically white for pickleball lines and a darker hue for basketball boundaries—and apply removable court tape to keep lines crisp.
What are the safety considerations when installing modular flooring?
Choose non‑slip, UV‑resistant tiles, ensure seams are flush, and install a level surface to prevent tripping or uneven ball bounce.
How often should I maintain the court to keep it in good condition?
Clean debris weekly, inspect tiles for wear quarterly, and reapply court tape or repaint lines annually or after heavy use.